


In a recent blog post we shared exciting news on new functionalities for detecting antimicrobial resistance (AMR) implemented within CLC Microbial Genomics Module, in addition to providing direct access to more antimicrobial resistance databases. With CLC Microbial Genomics Module we offer three pre-built tools for analyzing AMR determinants, including:
Use these tools with the ResFinder database of resistance genes, the ARG-ANNOT database of peptide markers, and the PointFinder database of variants known to cause antimicrobial resistance. QIAGEN has recently established a partnership with ARES-Genetics to provide exclusive access to ARESdb, their enormous genomic and phenotypic database of fully tested antibiotic-resistant strains of bacterial pathogens. We will be rolling out access to ARESdb, in stages, over the next few months as we develop the backend systems to query the data. Stay tuned!
On the topic of point mutations (SNPs, InDels, etc.), some customers have asked: "What's the best way to find mutations driving resistance in genomes not included in the PointFinder database?" Some have also asked how they might identify these markers if they curated their database of variants. In this blog post, we offer a potential path that will guide you through the steps for setting up your own variant database and how to use this to detect antimicrobial resistance in NGS data using CLC Genomics Workbench.
In only a few steps you can detect AMR mediating variants using your own database.
The database must be setup in the standard vcf-file format containing the eight mandatory columns for Chromosome (#CHROM), position (POS), unique identifiers (ID), reference bases (REF), non-reference allele bases (ALT), phred quality score (QUAL), description of filters applied (FILTER), and any lastly any additional user defined information (INFO) - which in this case will describe the resistance gene and antibiotic class, separated by semicolons. Any missing information is designated with a “.” in the appropriate column. These files can be manually created using any plain-text editor, or even in MS Excel, or directly within CLC Genomics Workbench using our editing and annotation tools*. An example of one of these files is shown below.

Figure legend: Standard .vcf file format describing genetic variants
Once all variants have been entered into the database and stored in vcf-format the file is ready for import into CLC Genomics Workbench.
In CLC Genomics Workbench the database in vcf-format must be imported as a track. The importer tool is found in the toolbar Import | Tracks. In the dialog the file type to import must be specified, e.g., VCF. The database is now available in the Workbench for use and can be displayed in both track view and as a table.
To detect variants in your pathogen isolate the NGS reads must be mapped to a closely related reference genome. The tools required for trimming the reads, mapping to a reference, and calling the variants have been collected in a pre-configured workflow “Map to specified reference” for ease-of-use. The workflow runs our basic variant detection tool as standard but can be customized to run one of the other variant callers if desired. The detected variants are output as a variant track file.
In step four all genetic variations between the isolate of interest and the reference genome were detected. The last step is to filter out those variants that are known to cause antimicrobial resistance by comparison to the variant database. This is performed with the tool “Filter based on overlap.” The tool is found in the Toolbox | Track Tools | Annotate and Filter | Filter Based on Overlap, and will take your variant file as input. Next, you are required to select an overlapping track which in this case is your database of known resistance mutations. If you select “Keep annotations that overlap” the tool will output a table of variants detected in your pathogen genome that is also present in your database.
Additionally the filtered variants can be visualized in a track view. Below the filtered variants are displayed along with the reference genome, reference CDS, and the database track. The variant can be selected in the table and will automatically be shown in the track view. The table will, in addition to the position of the detected variant, the coverage and the quality, also display information from the database entered into the INFO field. In this example “R” defines the antibiotic class and “G” the gene in which the variant is found.
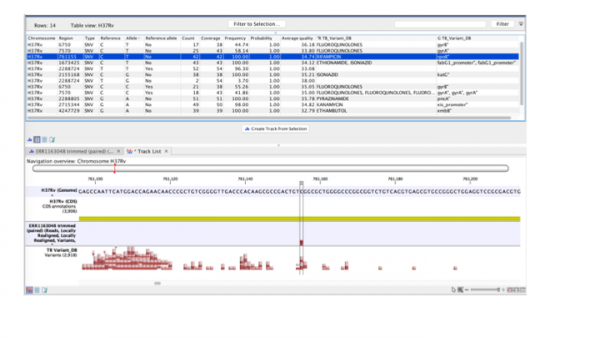
Figure legend: Results from filtering detected variants against a custom designed resistance database.
Using the functionalities of CLC Genomics Workbench antimicrobial resistance causing mutations can be detected for any desired microbe using any custom designed variant database.
CLC Genomics Workbench 12 - FREE Trial
Microbial Genomics Module - FREE Trial
* Users would edit sequences and their annotations within CLC, and then convert those edited sequences to individual track-files whereby the AMR variants would be a single track.